

- 1.1 Measuring Body Temperature
- 1.2 Assessment of Pulse
- 1.3 Assessing Respiration
- 1.4 Monitoring Blood Pressure
- 1.5 Checking Height and Weight of a Patient
- 1.6 Collecting Urine Specimen for Routine Examination
- 1.7 Testing Urine for pH
- 1.8 Testing Urine for Specific Gravity
- 1.9(a) Testing Urine for Glucose (Benedict's Solution)
- 1.9(b) Testing Urine for Glucose (Reagent Strip or Tape)
- 1.10 Testing Urine for Albumin
- 1.11 Collecting Urine Specimen for Culture
- 1.12 Collection of 24 hours Urine
- 1.13 Collecting a Stool Specimen for Routine Examination
- 1.14 Collecting a Stool Specimen for Culture
- 1.15 Collecting a Throat Swab for Culture
- 1.16 Collecting a Wound Swab for Culture
- 1.17 Protocol for Sample Collection of Blood
- 1.18 Collecting Blood for Routine Examination
- 1.19 Measuring Blood for Glucose Level using Glucometer
- 1.20 Collection of Blood for Culture
- 1.21 Collecting Blood for Peripheral Smear
- 1.22 Collection of Sputum for Culture
- 1.23 Assisting with Obtaining a Papanicolaou Smear
- 1.24 Measuring Intake and Output
- 1.25 Teaching Breast Self-examination
- 1.26 Teaching Testicular Self-examination
1.1: MEASURING BODY TEMPERATUER
DEFINITION
Measuring temperature of the body using a clinical thermometer.
COMMON METHODS
- Oral
- Rectal
- Axillary
- Tympanic membrane
INDICATIONS
- Routine part of assessment on admission for establishing a base-line data.
- As per agency policy to monitor any change in patient condition.
- Before, during and after administration of any drug that affects temperature control function.
- When general condition of patient changes.
- Before and after any nursing intervention that affects temperature of the patient.
PURPOSES
- To assess the general health status of patient.
- To assess for any alteration in health status.
CONTRAINDICATIONS
- Oral method
- Patients who are not able to hold thermometer in their mouth.
- Patients who may bite the thermometer like psychiatric patients.
- Infants and small children
- Surgery/infection in oral cavity
- Trauma to face/mouth
- Mouth breathers
- Patients with history of convulsion
- Unconscious/semi conscious/disoriented patients.
- Patients having chills
- Unco-operative patients.
- Patients who cannot follow instructions.
- Rectal method
- Patients after rectal surgery
- Any rectal pathology (piles/tumor)
- Patients having difficulty in assuming position
- Acute cardiac patient
- Patients having diarrhea
- Reduced platelet count.
- Axillary method
- Any surgery/lesion in axilla.
ARTICLES
A clean tray containing
- A bottle with disinfectant solution (dettol 1: 40/savlon 1:20)
- A bottle with water
- Thermometer (rectal thermometer in case of rectal method)
- A small bowl with cotton swabs
- Paper bag/kidney tray
- Pens
- Flow sheet/graphic chart/paper
- Lubricant (in case of rectal/method)If using more than one thermometer, use 3 bottles (2 with antiseptic solution and one with water).
PROCEDURE
Nursing action | Rationale | |
|---|---|---|
1 | Ascertain method of taking temperature and explain procedure to the patient and instruct him how to co-operate. | |
a. In case of oral method, ensure that patient had not taken any hot or cold food and fluids orally or smoked in 15–30 minutes prior to procedure. | Causes alteration in temperature reading. | |
b. For rectal method, provide privacy and position the patient in a Sim's position. In young children position laterally with knees flexed or prone across lap. | Position ensures easy access to insert thermometer. | |
c. For axillary method, expose axilla and pat dry with a towel. Avoid vigorous rubbing. | Friction produced by rubbing can cause increase in temperature. | |
2 | Wash hands | |
3 | Prepare equipment | |
a. If glass thermometer is in disinfectant solution, transfer it to container with plain water using dominant hand. | Ensures complete removal of disinfectant and reduces irritation to tissues. Using dominant hand reduces chances of accidental breakage. | |
b. Wipe thermometer dry, using a clean cotton swab using rotatory motion from bulb to stem. | Wiping from an area of least contamination to an area of greatest contamination prevents spread of organisms. | |
c. Shake down the mercury (if needed) by holding thermometer between thumb and forefinger at the tip of stem. Shake till mercury is below 35 degree centigrade (95 degree Fahrenheit). | Reduces chances of error in reading temperature. | |
4 | Take temperature | |
a. For oral method | ||
| Blood supply is more in this area and hence reflects the temperature of blood in the larger blood vessels. | |
| Clenching teeth can cause the thermometer to break and cause injury. | |
| Ensures accurate recording | |
b. For rectal method | ||
| ||
| Lubricant facilitates easy insertion without irritating mucous membrane. | |
| Taking deep breathe relaxes external sphincter thereby facilitating easy insertion. | |
| Ensures accurate recording | |
| Prevents thermometer from falling down. Ensures accurate recording | |
c. For axillary method
| ||
5 | Remove thermometer | |
Wipe using a cotton ball from stem to bulb in a rotatory manner. | Wiping from an area of least contamination to an area of greatest contamination will help in preventing spread of microorganisms. | |
6 | Read the temperature, holding thermometer at eye level and rotate it till reading is visible and read it accurately. | Holding at eye level prevents error in reading. |
7 | Shake down the mercury level | |
8 | Clean thermometer using soap and water. | Removes organic material. |
9 | Dry it and store it in disinfectant solution. | |
10 | Document temperature | |
11 | Wash hands | Reduces risk of transmission of microorganisms. |
12 | Replace articles. | |


SPECIAL POINTS
- It is always best to use individual thermometer for each patient.
- When individual thermometer is not used in patient care-units (wards), axillary method is recommended.
- For converting temperature from centigrade to Fahrenheit following conversion formula can be used.C = 5/9 × F-32[C = degree centigrade][F = degree Fahreheit]
1.2: ASSESSMENT OF PULSE
DEFINITION
Checking pulse rate, rhythm, volume, etc. for assessing circulatory status.
PURPOSES
- To establish baseline data
- To check abnormalities in rate, rhythm and volume
- To monitor any change in health status of the patient.
- To check the peripheral circulation.
|
ARTICLES
- Wrist watch with second hand
- Pen (color as per agency policy)
- Vital signs chart and flowsheets


PROCEDURE
Nursing action | Rationale | |
|---|---|---|
1 | Explain procedure to patient and check if the patient had been involved in any activity. If so allow the patient to rest for 10 minutes before taking pulse. | Activity can increase the pulse rate. |
2 | a. Select the pulse site | Usually radial pulse is selected. If any particular extremity is to be assessed then another pulse site is to be selected. |
b. Assist the patient to a comfortable position. For radial pulse, keep the arm, resting over chest or on the side with palm facing downward. In sitting position, keep the arm resting over thigh with palm facing downward. | ||
3 | Palpate and check pulse | |
a. Place tips of 3 fingers other than thumb lightly over pulse site. | Thumb is not used for assessing pulse as it has its own pulse which can be mistaken for patient's pulse. | |
b. After getting the pulse regularly, count the pulse for one whole minute looking at the second hand on the wrist watch. | Irregularities can be noticed only if pulse is counted for one whole minute. | |
c. Assess for rate, rhythm and volume of pulse and condition of blood vessel. | ||
4 | Document and report pertinent data in the appropriate record. | |
5 | Wash hands. |
SPECIAL POINTS
- Never press both carotids at the same time, as this can cause reflex drop in blood pressure/pulse rate.
- Carotid pulse is used for victims of shock and cardiac arrest when pulse is not palpable at other sites.
- Brachial and femoral sites are used with cardiac arrest in infants.
1.3: ASSESSING RESPIRATION
DEFINITION
Monitoring inspiration and expiration in a patient.
PURPOSES
- To assess rate, rhythm and volume of respiration.
- To assess for any change in condition and health status.
- To monitor the effectiveness of therapy related to respiratory system.
ARTICLES
Wrist watch with second hand, graphic record, pen (color according to agency policy).
PROCEDURE
Nursing action | Rationale | |
|---|---|---|
1 | Ensure that patient is relaxed Assess other vital signs such as pulse or temperature prior to counting respirations. | Awareness of the procedure may alter the rate of respiration. Conscious patients when relaxed and unaware of procedure tend to have accurate respiratory rate. |
2 | Assess for factors that may alter respiration. | Allows nurse to accurately assess for presence and significance of respiratory alteration. |
3 | Wait for 5 –10 minutes before assessing respiration if patient had been active. | Activity may increase rate and depth of respiration. |
4 | Position patient in sitting or supine position with head elevated at 45–60 degree. | Ensures proper assessment. |
5 | Keep your fingers over the wrist as if checking pulse, and position patient's hand over his lower chest or abdomen. | Makes the patient less aware of his respiration. Keeping hand over chest or abdomen makes the movement of chest more visible. |
6 | Observe one complete respiratory cycle-inspiration and expiration. | |
7 | Assess rate, depth, rhythm and character of respiration. | Depth of respiration reveals volume of air moving in and out of lungs. Abnormalities of rhythm and character reveals specific disease condition. |
8 | Count respiration for one whole minute. | |
9 | Wash hands | |
10 | Record the findings and report any abnormal findings. |
1.4: MONITORING BLOOD PRESSURE
DEFINITION
Measuring blood pressure using a sphygmomanometer.
PURPOSES
- To determine patient's blood pressure as a baseline for comparing future measurements.
- To aid in diagnosis.
- To aid in the assessment of cardiovascular system preoperatively and postoperatively, during and after invasive procedures.
- To monitor change in condition of the patient.
- To assess response to medical therapy.
- To determine patient's hemodynamic status.
ARTICLES
- A sphygmomanometer comprising of:
- Compression bag/inflatable rubber bladder enclosed in a cloth cuff (appropriate size)
- An inflating bulb (by which pressure is raised)
- A manometer (mercury) from which pressure is read.
- A screw type release valve for inflation and deflation (pressure control.)
- Stethoscope.
- Patient chart for recording.
- Black/blue pen for charting.
PROCEDURE
Nursing action | Rationale | |
|---|---|---|
1 | Check physician's order, nursing care plan and progress notes | Obtains any specific instruction/information. |
2 | Explain the procedure and reassure the patient. Ensure that patient has not smoked, ingested caffeine or involved in strenuous physical activity within 30 minutes prior to procedure. | Obtains patient consent and co-operation and also relieves anxiety. Smoking, caffeine can increase blood pressure. |
3 | Wash and dry hands | Prevents cross-infection |
4 | Assist the patient to either sitting or lying down position | Obtains an accurate reading |
5 | Collect and check equipment | Ascertains evidence of malfunction |
6 | Position the sphygmomanometer at approximately heart level of the patient ensuring that mercury level is at zero. (Figure 1.4(a)) | Helps in obtaining accurate reading. |
7 | Select a cuff of appropriate size (Figure 1.4(b)) | Ensures that compression bladder width is at least 20% wider than the diameter of the mid-point of the exterimity used. If the bladder is too wide the reading may be erroneously low. If it is too small, the reading may be erroneously high. |
8 | Expose the arm to make sure that there is no constrictive clothing above the placement of cuff. | Ensures accurate reading. |
9 | Apply the cuff approximately 2.5 cm above the point where brachial artery can be palpated. The cuff should be applied smoothly and firmly with the middle of the rubber bladder directly over the artery (Figure 1.4(c)). | Ensures accurate reading Wrapping the cuff too tightly will impede circulation. Wrapping the cuff very loosely will lead to false elevation of pressure. |
10 | Secure the cuff by tucking the end under or by fixing the velcro fastener. | Prevents unwrapping of the cuff. |
11 | Place the entire arm at the patient's heart level. | Obtains accurate reading. For every cm that the cuff is above/below heart level. Blood pressure varies by 0.8 mm of mercury. |
12 | Keep the arm well rested and supported | Ensures comfort of the patient thereby enabling an accurate reading. Movement of arm can cause noise when auscultating. |
13 | Place yourself in a comfortable position. | |
14 | Connect the cuff tubing to the manometer tubing and close the valve of the inflation bulb. | |
15 | Palpate the radial pulse and inflate the cuff until pulse is obliterated | Estimates systolic pressure in order to determine how high to pump the mercury in order to avoid error related to auscultatory gap. |
16 | Inflate the compression bag a further 20–30 mm of mercury and then deflate cuff slowly. Note the point at which pulse reappears. Release the valve. | Ensures that mercury column is high enough to minimize error related to auscultatory gap. The point at which pulse reappears is the systolic pressure. |
17 | Palpate brachial artery and place diaphragm of the stethoscope lightly over the brachial artery. Ensure that ear pieces of the stethoscope are placed correctly (slightly tilted forward and ensure that tubing hangs freely) Raise mercury level 20–30 mm of mercury above the point of systolic pressure obtained by means of palpatory method (Figure 1.4(d)). | Ensures accurate reading. If diaphragm is placed too firmly the artery gets compressed. Sounds are heard better with correct placement of stethoscope. Rubbing of stethoscope against an object can obiliterate Korot-Kov's sounds. |
18 | Release the valve of the inflation bulb, so that mercury column falls at the rate of 2–3 mm of mercury/sec. | Prevents venous congestion and falsely elevated pressure reading due to slower rate of deflation and prevents erroneous reading due to faster rate of deflation. |
19 | When first sound is heard, the mercury level is noted, this denotes systolic pressure. | First sound is heard when the blood begins to flow through brachial artery. |
20 | Continue to deflate the cuff. When the sound disappears note the mercury level. This is diastolic pressure. | |
21 | Deflate cuff completely. Disconnect the tubing and remove the cuff from the patient's arm. | Occlusion of artery during the pressure reading causes venous congestion in the forearm. |
22 | Repeat the procedure after one minute if there is any doubt about the reading. | Waiting time of one minute allows venous blood to drain completely. |
23 | Ensure that patient is comfortable. | |
24 | Remove equipment and clean ear piece with a spirit swab. | |
25 | Wash and dry hands | Prevents chances of cross-infection. |
26 | Document the reading in appropriate observation chart or flow chart. | |
27 | Report any abnormal findings. | |


SPECIAL PRECAUTIONS
- Do not take blood pressure on a patient's arm if
- The arm has an intravenous infusion on it
- The arm is injured/diseased.
- The arm has a shunt/fistula for renal dialysis.
- On the same side if the patient had a radical mastectomy
- If the arm is paralysed.
- Always check supine measurement before checking upright measurement.
- If blood pressure has to be taken at the same time in two or more positions— Lying, sitting or standing at the same time for comparison, wait for a minimum of 3 minutes after assuming that position before taking the reading.
- If comparison is needed for blood pressure in lying/standing position, the patient must be in lying/standing position for a minimum of 3 minutes.
- Appropriate sized cuff should be used.
1. 5: CHECKING HEIGHT AND WEIGHT OF A PATIENT
Measuring the height and weight using accurate scales and measuring devices.
PURPOSES
- To assess fluid balance in patients with fluid retention, renal problems and cardiac problems.
- To assess the response to therapy, e.g. diuretics
- To ascertain the response to physiological changes or prescribed diet, e. g. pregnancy, high calorie diet.
- To obtain baseline data about patient's health status.
ARTICLES
- Weighing machine (electronic weighing scale)ORSling scale
- Measuring tape and stick
- Ruler.
PROCEDURE
Nursing action | Rationale | |
|---|---|---|
1 | Assess the patient's ability to stand independently on the weighing machine. | Ensures safety of patient while checking weight and height. |
Checking of weight while standing on electronic scale: | ||
2 | Wash hands | Reduces transmission of microorganisms. |
3 | Explain the procedure to the patient and ask patient to void. Instruct patient to wear a hospital gown. | Helps to gain cooperation of the patient and voiding will reduce the weight of urine in the bladder. Extra clothing will cause errors in reading of weight. |
4 | Place the weighing machine near the patient. | Reduces risk of fall/injury. |
5 | Turn on the scale and calibrate it to zero. | Ensures accurate reading. |
6 | Instruct patient not to step on the scale until the digital display shows zero. | For accurate reading. |
7 | Ask patient to remove shoes and heavy clothing and step on the scale and stand erect and still. | |
8 | Read weight after digital numbers have stopped fluctuating. | Reading is not accurate when numbers are still fluctuating. |
9 | Ask the patient to step down and assist the patient back to bed or chair. | Reduces risk of injury. |
10 | Wash hands | Reduces transmission of microorganisms. |
Checking of weight in a sling scale: | ||
11 | A sling is placed under the patient carefully without any folds. | More accurate weight will be obtained by leaving no bedding between sling and the patient. |
12 | Put on the scale and calibrate it to zero. | |
13 | Lower the arms of the sling scale and slip hooks through the holes of the sling. | This is to attach the sling to the sling scale to measure the weight. |
14 | Pump scale until sling rests completely off the bed. | Ensures accurate weight reading. |
15 | Read weight after digital numbers have stopped fluctuating. | Reading is not accurate when numbers are fluctuating. |
16 | Lower the sling arms and place the patient comfortably on the bed. | Ensures patient comfort. |
Measuring height: | ||
17 | Ask the patient to remove the shoes. | Ensures accurate checking of height. |
18 | A measuring tape or stick can be held or attached to the wall vertically. | |
19 | Instruct the patient to stand erect, with heels together. | Helps in obtaining accurate measurement. |
20 | With a stick or ruler placed horizontally on the head at 90 degree angle to the measuring tape, the height is measured in inches/cms. | |
21 | Provide the patient a comfortable position in bed. | Ensures patient's comfort. |
22 | Replace the articles | |
23 | Wash hands | Reduces transmission of microorganism. |
24 | Record the procedure with date, time and height and weight. | Documentation helps in continuity of care. |
SPECIAL CONSIDERATIONS
- Weigh patient at the same time with same amount of clothing each day to enhance accurate reading.
- Preferably use the same weighing scale while weighing patients daily.
- Weighing machine with attached scale for measuring height can be used to measure height and weight.
1.6: COLLECTING URINE SPECIMEN FOR ROUTINE EXAMINATION
DEFINITION
Collection of a small quantity (4 ounce /120 ml) of urine sample in a clean container for testing it in the laboratory.
PURPOSE
To detect and measure the presence of abnormalities in urine such as red blood cells, white blood cells, casts, pH, sugar, albumin and specific gravity.
ARTICLES
- Clean, wide mouthed container.
- Bed pan or urinal
- Appropriate laboratory forms
- Soap and water
- Laboratory requisition form
- Gloves.
PROCEDURE
Nursing action | Rationale | |
|---|---|---|
1. | Check the physician's order and nursing care plan | Obtains specific instructions and information |
2. | Identify the patient | Ensures that right procedure is performed for right patient. |
3. | Explain procedure to the patient with specific instructions about washing the genital area (skin around the urethral meatus) with soap and water and give the labelled container. Instruct patient not to wet the label on the out side (Figure 1.6(a)) | Washing the genital area prevents contamination of urine specimen. Label on the container must have the patient's full name, ward, register number of the patient, type of test to be done and date. |
4. | Ask the patient to direct the first and last part of the urine stream into a urinal or toilet and to collect the middle part of the stream into the specimen container (Figure 1.6(b)). | Collecting the midstream urine avoids contamination of the specimen with organisms normally present on the skin. Four ounces of urine is required for the test. |
5. | Have the patient place the specimen container in proper/designated place | |
6. | With gloved hand place the specimen container in polythene bag | Protects health care worker from possible exposure to microorganisms. |
7. | Send specimen to the laboratory with completed, signed laboratory form | |
8 | Remove gloves and wash hands | |
9. | Record the procedure in the nurse's notes and other appropriate forms. | |


SPECIAL CONSIDERATIONS
- It is preferable to collect morning specimens whenever possible.
- A clean – catch midstream urine specimen is collected to detect any urinary tract infection.
- Specimens collected from menstruating and postpartum patients should have the information included in the requisition form.
- Always cover specimen to prevent carbon dioxide from air diffusing into urine which will result in urine becoming alkaline and fostering bacterial growth.
1.7: TESTING URINE FOR pH
DEFINITION
Testing urine for pH by dipping litmus paper into it and noting resultant color change.
PURPOSE
To determine acid-base balance.
ARTICLES
- Urine specimen container.
- Litmus strip
- Clean gloves
- Kidney tray.
PROCEDURE
Nursing action | Rationale | |
|---|---|---|
1. | Explain procedure to the patient and provide specimen container | Obtains co-operation of the patient |
2. | Don gloves obtain specimen from patient | Reduces risk of contamination with urine. |
3. | Dip litmus strip in urine and keep for one minute and note color change
| Shows the reaction of urine |
4. | Discard strip into container for infected waste | Proper disposal ensures safety |
4. | Discard urine specimen in sluice room/toilet | |
5. | Record the procedure in nurse's notes including the result noted | Recording gives information about the result of the procedure. |
Note - The normal pH of urine is 4–8 | ||
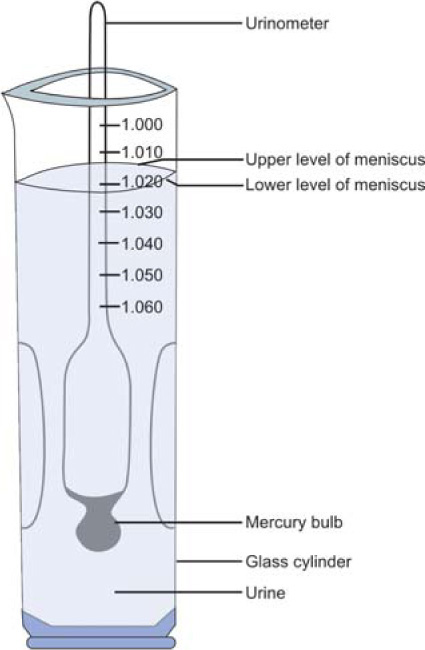
1.8: TESTING URINE FOR SPECIFIC GRAVITY
DEFINITION
Measuring specific gravity of urine using a caliberated hydrometer/urinometer.
PURPOSES
- To determine the level of concentration of urine.
- To diagnose conditions like diabetes insipidus.
ARTICLES
- Container to collect urine
- Calibrated urinometer
- Jar for urine
- Clean gloves.
PROCEDURE
Nursing action | Rationale | |
|---|---|---|
1. | Explain procedure to the patient and provide container to collect urine | Facilitates co-operation of the patient to collect urine |
2. | Don gloves. | Reduces risk of contamination. |
3. | Fill three fourths of jar with urine | Permits urinometer to float free in urine |
4. | Gently place urinometer into jar | |
5. | Make sure that instrument floats freely and does not touch bottom and sides of jar (Figure 1.8(a)) | If urinometer touches the jar reading will be false |
6. | When urinometer stops bobbing, read specific gravity directly from scale marked on calibrated stem of urinometer. | |
Read scale at lowest point of meniscus to ensure an accurate reading at eye level | Reduces errors of reading. | |
(Normal specific gravity of urine is 1.010–1.025) | ||
7. | Discard urine, and rinse jar and urinometer in running water | Prevents contamination |
8. | Remove gloves and wash hands. | Reduces transmission of microorganisms. |
9. | Replace articles and record the procedure in Nurse's Record or flowsheet according to policy | Recording gives information about the procedure results to health workers. |
SPECIAL CONSIDERATION
1.9 (A): TESTING URINE FOR GLUCOSE (Benedict's Solution)
DEFINITION
Testing a specimen of double-voided urine using Benedict's solution for presence of glucose.
PURPOSE
To estimate the amount of glucose present in urine.
ARTICLES
- Spirit lamp
- Match box
- Test tube with test tube holder
- Test tube stand
- Benedict's solution
- Dropper
- Duster
- Kidney tray
- Clean, disposable gloves.
PROCEDURE
Nursing action | Rationale | |
|---|---|---|
1 | Explain about method of collecting a double voided specimen of urine | Proper explanation helps the patient to collect specimen in a correct manner. |
2 | Provide labeled container for collecting urine | |
3 | Don gloves and collect urine specimen from patient | Reduces risk of contamination |
4 | Take test tube and fix in holder. Pour 5 ml of Benedict's solution into test tube. | Benedict's solution is used to find out presence of glucose in urine |
5 | Light spirit lamp and heat Benedict's solution till it boils, holding test tube with mouth facing away from the nurse. | On heating if color of solution changes, it indicates that the solution is not suitable for testing. |
6 | Add eight drops of urine using dropper, through the sides and allow to boil for another few seconds | |
7 | Put off flame and allow it to cool | Cooling completes color change when glucose is present in urine |
8 | Watch for color change and compare with standard color code | Normal urine does not contain sugar |
|
| |
9 | Discard urine in toilet or sluice room and rinse container | |
10 | Replace the equipment after washing in proper place | |
11 | Discard gloves and wash hands. | Reduces risk of transmission of microorganisms. |
12 | Record result in “Diabetic urine chart” and inform doctor for appropriate management/insulin order. | Recording the reaction gives information for further management. |
1.9 (B): TESTING URINE FOR GLUCOSE (REAGENT STRIP OR TAPE)
DEFINITION
Testing urine for glucose using reagent strips such as Diastix or test tape.
ARTICLES
- Urine specimen in a container
- Reagent strips in container
- Clean disposable gloves
- Receptacle for used strip.
PROCEDURE
Nursing action | Rationale | |
|---|---|---|
1 | Provide labeled container for collecting urine | |
2 | Explain about method of collection of double voided specimen | Proper explanation helps the patient to collect specimen in a correct manner |
3 | Don gloves and and collect urine specimen from patient | |
4 | Dip the portion of the strip with reagent in urine | Colour change occurs in the strip according to the amount of glucose present in urine |
5 | Compare the color of the strip with the color chart on the reagent strip container or separate chart (Figure 1.9 a) | Colour change indicates the presence and amount of glucose in urine |
6 | Discard the used strip and used articles. | |
7 | Replace the reusable items and wash hands. | |
8 | Record in the patient's chart result of the test. | Conveys information to physician and other staff. |
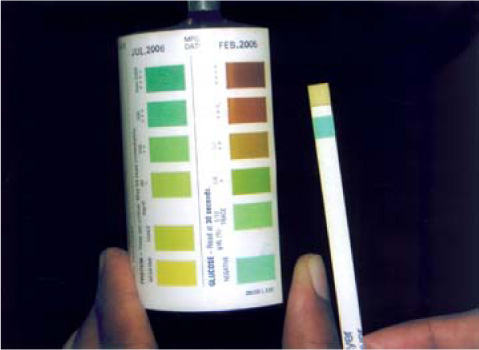
Presence of Ketone bodies (acetone) are also tested using reagent tablets (Acetest) or reagent strips (Ketostix). Combined Ketone glucose reagent strips (keto-diastix) are also available for use.
SPECIAL CONSIDERATION
- The part of the strip with the reagent should not be touched with bare hands. Care should be taken to see that the dipstick should not be exposed to sunlight while storing.
1.10: TESTING URINE FOR ALBUMIN
DEFINITION
Testing urine for presence of albumin using hot test method.
ARTICLES
- Spirit lamp.
- Match box.
- Test tube and holder.
- Test tube stand
- Two percent acetic acid.
- Dropper
- Specimen container.
- Duster
- Kidney tray.
- Litmus paper
- Clean disposable gloves.
PROCEDURE
Nursing action | Rationale | |
|---|---|---|
1. | Explain to the patient about the test to be done and provide container for collecting urine | Obtains co-operation of patient |
2. | Don gloves | |
3. | Fill ¾ th of a test tube with urine, secure test tube holder at its top end | |
4. | Check the reaction of urine, if found alkaline, add one drop of acetic acid and make it acidic | If the urine is highly alkaline or acidic, it will give false reading. |
5. | Heat the upper third of urine over the spirit lamp and allow it to boil. Keep the mouth of the test tube away from your face. | Prevents scalding |
6. | A cloud may appear either due to phosphate or albumin. Add 2–3 drops of acetic acid into the test tube. If the urine still remains cloudy, it indicates the presence of albumin.
If it becomes clear, it indicates the presence of phosphates | Confirms the presence of albumin Normal urine does not contain albumin |
7. | Discard the urine and rinse the test tube. Replace articles | Cleaning the test tube and keeping ready helps for the next use. |
8. | Discard gloves and wash hands. | Prevents transmission of microorganisms. |
9. | Record the procedure with date and time in nurse's record or flowsheet according to hospital policy | Gives the information about patient's health status. |
1.11: COLLECTING URINE SPECIMEN FOR CULTURE
DEFINITION
Collection of a small sample of urine (30 to 60 ml) for detecting the presence and growth of microorgnisms in the sample.
PURPOSES
- To culture pathogenic microorganisms present in the urine.
- To determine antibiotic sensitivity of the pathogens in the urine.
ARTICLES
- Sterile urine container
- Laboratory form
- Soap and water
- Bed pan (for non-ambulatory patient)
PROCEDURE
Nursing action | Rationale | |
|---|---|---|
1 | Check the physician's order and identify patient. | Helps to understand purpose of procedure for the patient. |
2 | Assess the patient's mobility status and activity tolerance to use the toilet facilities | Determines the level of assistance required |
3 | Explain procedure to patient including reason for collecting specimen, and how patient can collect an uncontaminated specimen (if patient is able to) | Contaminated urine may result in false results. |
4 | Wash hands and don gloves if nurse is to perform procedure | |
5 | Provide privacy by closing curtains and/or door. | Privacy allows patient to relax and reduces embarrassment. |
6 | Instruct patient to cleanse the perineum (See Figure 1.6(a)) Female: Wash the urethral meatus and surrounding area with soap and water. Male: Hold the penis with one hand and cleanse the end of penis moving from center to outside using soap and water. For helpless patients: The nurse should provide hygienic perineal care. | |
7 | Assist bedridden patient on to bed pan | |
8 | Instruct to open specimen container and place cap with sterile inside surface up and not to touch inside of container and lid. | Contaminated specimen will lead to inaccurate reporting of culture and sensitivity. |
9 | Instruct ambulatory patients to: Female: • Sit with legs separated on toilet Male: • Sit down to control splashing. | Prevents contamination of container from outside |
10 | Instruct patient to direct the first and last part of the urine stream into the toilet or bedpan, collect the middle part of the stream into the sterile container. (Midstream sample) | Prevents contamination of the specimen with skin flora |
11 | Replace cap securely on specimen container, cleanse any urine from external surface of container and place container in plastic bag or in the designated place. | Prevents transfer of microorganisms to others |
12 | Remove bedpan (if applicable) and assist patient to comfortable position | Promotes relaxing enviornment |
13 | Label specimen and send to laboratory with completed requisition form. | Prevents inaccurate identification that could lead to errors in diagnosis and therapy. |
14 | Remove gloves and dispose in proper receptacle (if used for bed-ridden patient) and wash hands | Reduces transmission of microorganisms. |
15 | Transport urine specimen to laboratory within 15 minutes or refrigerate immediately. | Bacteria grow quickly in urine and specimen should be analyzed immediately to obtain correct results. |
16 | Record in the nurse's notes the time of urine collection and any other observation. | Documents implementation of physcian's order. |
SPECIAL CONSIDERATIONS
- Patients who are catheterized should have the specimen withdrawn using a sterile needle and syringe from the catheter's sampling port. Clamp the collection tube for about 30 minutes before taking sample.
- Urine specimen must be transported to the laboratory promptly. If not cultured within 30 minutes of collection, urine must be refrigerated and culture done within 24 hours.
- About 30 minutes prior to collecting the specimen, patient may be encouraged to drink fluids unless contraindicated.
1.12: COLLECTION OF 24 HOURS URINE
DEFINITION
Collection of urine specimen for a period of 24 hours without any spillage or wastage.
PURPOSES
- To detect kidney, liver and cardiac conditions.
- To measure total protein, creatinine, electrolytes, 17 ketogenic steroid, oxylate, porphyrins, drugs, vitamins, VMA, minerals, hormones etc.
ARTICLES
- Clean container with preservative, of not less than 3 liters capacity with label, obtained from the laboratory (biochemistry).
- Urinal or kidney tray to collect urine at each voiding.
- Appropriate laboratory form, duly filled.
PROCEDURE
Nursing action | Rationale | |
|---|---|---|
1. | Check the physician's order and nursing care plan | Obtains specific instructions/information |
2. | Identify the patient | Ensures that right procedure is performed on the right patient |
3. | Explain to the patient, the purpose of procedure and, that all urine for the full 24 hours must be saved | Gains patient's consent and co-operation |
4. | Instruct the patient to void at the time set to begin the procedure. E.g: at 6.00 am. Discard this specimen. Record in Nurses Notes, the time when collection began | Ensures that urine collected is produced within the 24 hours of testing |
5. | Measure and pour all the subsequent voidings into the container | A 24 hours collection will accommodate all the variables in body chemistry within a representative period |
6. | Collect the final specimen at exactly the same time the patient voided 24 hours earlier. E.g: 6.00 am the following day | |
7. | Send the container with urine to laboratory when the collection is over, with requisition forms | |
8. | Record in the Nurse's notes time of completing the collection and despatching the urine to the lab | |
9. | Clean, disinfect and replace the kidney tray or urinal if they are reusable. |
1.13: COLLECTING A STOOL SPECIMEN FOR ROUTINE EXAMINATION
DEFINITION
Collection of a small quantity of stool sample in a container for testing in the laboratory.
PURPOSE
To test the stool for normalcy and presence of abnormalities.
ARTICLES
- A clean specimen container.
- A spatula for putting the specimen into the container.
- Dry bed-pan (for helpless patients). Additional bedpan for rinsing and cleaning.
- Laboratory requisition form.
- Clean gloves.
- Waste paper (for wrapping used spatula).
- A pitcher of water (for helpless patient).
- Tissues/towel.
PROCEDURE
Nursing action | Rationale | |
|---|---|---|
1. | Check the physician's order and ‘Nursing Care Plan’. | Obtains specific instruction and information. |
2. | Identify the patient. | Helps to perform the right procedure for the right patient. |
3. | Explain to patient the procedure and make clear what is expected of him/her. | Aids in proper collection of specimen. |
4. | Give the labelled container and spatula to the patient with instructions.
| |
5. | Don gloves | |
6. | For helpless patient: assist patient on to the clean bedpan. | |
7. | Leave him with instructions | |
8. | When done, remove and keep aside the bedpan after placing the second one for cleansing | |
9. | Once the specimen is collected sent it to lab with the appropriate requisition forms | |
10. | Wash and replace the reusable articles | |
11. | Dispose off the used spatula wrapped in waste paper. | Prevents contamination |
12. | Wash and dry hands. | Prevents cross contamination. |
13. | Record information in the patient's chart. |
SPECIAL CONSIDERATIONS
- Send specimen to be examined for parasites immediately, so that parasites may be observed under microscope while viable, fresh and warm.
- Inform if bleeding hemorrhoids or hematuria is present.
- Postpone test if woman has menstrual periods, until three days after it has ceased.
- Consider that intake of folic acid, anticoagulant, barium, bismuth, mineral oil, vitamin C, and antibiotics may alter the results.
- Use two bedpans for helpless patient – one for collecting specimen and the another for cleaning.
1.14: COLLECTING A STOOL SPECIMEN FOR CULTURE
DEFINITION
Collection of a small quantity of stool sample for culture/microbiological examination.
PURPOSE
To culture the organisms that are not part of the normal bowel flora, e.g.: Salmonella, Shigella, Rotavirus, etc.
ARTICLES
- Sterile stool container/specimen container.
- Sterile spatula/swab stick.
- Bedpans (two bedpans for helpless patients).
- Laboratory requisition form.
- Clean gloves.
- Tissues.
PROCEDURE
Nursing action | Rationale | |
|---|---|---|
1. | Check the physician's order and nursing care plan | Obtains specific instructions and information. |
2. | Identify the patient | Helps in performing the right procedure for the right patient. |
3. | Explain to patient the procedure and make clear what is expected of him/her.
| Aids in proper and adequate collection of specimen. |
4. | Give labelled container and spatula to the patient with instructions. | |
5. | Once the specimen is collected, wear gloves, take the container from patient and send it to the lab with the completed lab requisition | |
6. | Wrap spatula in waste paper and discard appropriately. | |
7. | Wash and replace the reusable articles | |
8. | Wash and dry hands | Prevents cross contamination. |
9. | Record the procedure in the patients’ record. |
SPECIAL CONSIDERATIONS
- Stool specimen for culture can be obtained directly from the rectum using a sterile swab.
- If a patient passes blood and mucus, include this information in specimen label.
- Provide assistance to helpless patients for sitting on pan, cleaning after defecation and collecting specimen.
1.15: COLLECTING A THROAT SWAB FOR CULTURE
DEFINITION
Collecting the exudates from throat or tonsil for laboratory test.
PURPOSE
To identify the pathogenic organisms.
ARTICLES
- Tongue depressor to hold the tongue down.
- Cotton tipped applicators in sterile packed test tube to collect the specimen for transportation to the lab.
- Laboratory requisition form.
- Clean, dry, gauze pieces.
- Disposable gloves.
PROCEDURE
Nursing action | Rationale | |
|---|---|---|
1. | Check the physician's order | |
2. | Identify the patient | |
3. | Explain to patient the procedure and instruct him how he/she must co-operate. | Knowledge of the procedure facilitates patient co-operation |
4. | Wash hands and put on gloves | Protects the health care worker from contamination with saliva. |
5. | Instruct the patient to open his mouth and hold the tongue down with a tongue depressor. If gag reflex is active in patient, make him to sit upright and if health permits, instruct patient to open mouth, extend tongue and say “Ah”. | Sitting position and extension of tongue helps to expose the pharynx. Saying “Ah relaxes throat muscles. |
6. | Carefully yet firmly rub the swab or cotton applicator over areas of exudate or over the tonsil and posterior pharynx, avoiding the cheeks, teeth and gums (Figure 1.15(a)) | Firm rubbing will aid in obtaining an adequate sample. |
7. | Insert swab or applicator into the sterile packet, or test tube. | Keeping the applicator directly in the packet will avoid contamination |
8. | Send specimen to the laboratory immediately with the requisition form duly filled | |
9 | Clean and replace the reusable articles | |
10. | Remove gloves and discard wash hands | |
11. | Record in appropriate patient record |

1.16: COLLECTING A WOUND SWAB FOR CULTURE
DEFINITION
Collection of wound exudates/discharge for laboratory examination.
PURPOSE
To identify aerobic and anaerobic organisms present in the wound.
ARTICLES
- Cotton applicators.
- Culture tube or container for transporting the specimen
- Laboratory requisition form
- Disposable gloves
PROCEDURE
Nursing action | Rationale | |
|---|---|---|
1. | Check the physician's order | |
2. | Identify the patient | Ensures that the right procedure is done on right patient. |
3. | Explain the procedure to patient | Allays anxiety and promotes patient co-operation |
4. | Screen the bed and provide privacy | Reduces anxiety |
5. | Wash hands and wear gloves | Reduces risk of transmission of microorganisms. |
6. | Expose the wound area | |
7. | Using the cotton – tipped applicators, swab and collect as much exudate as possible from the center of the lesion. | Swabbing the surrounding skin will alter the findings |
8. | Place the swab immediately in appropriate transport culture tube and send to laboratory labelled clearly, specifying the anatomic part from where the specimen was obtained. | Clear labelling aids in accurate reporting of the test |
9. | Record information in the patient's chart |
1.17: PROTOCOL FOR SAMPLE COLLECTION OF BLOOD
Test | Sample type | Volume required | Container | Related instruction | Normal values | |
|---|---|---|---|---|---|---|
1. | Blood glucose | Serum | 3.0 ml clotted | Plain red top | FBS (Fasting) RBS (Random) | 70–110 mg% less than 200 mg/dl |
2. | BUN (Blood urea nitrogen) | Serum | 3.0 ml clotted | Plain red top | 8–25 mg% | |
3. | Creatinine | Serum | 3.0 ml clotted | Plain red top | 0.6–1.5 mg% | |
4. | Total protein | Serum | 3.0 ml clotted | Plain red top | Albumin 3.5–5 mg% | |
5. | AST (Asparatate aminotransferase) | Serum | 3.0 ml clotted | Plain red top | 10–40 units/ml | |
6. | Bilirubin | Serum | 3.0 ml clotted | Plain red top | Total 1.0 mg/100 ml Direct 0.4 mg/100 ml Indirect 0.6 mg/100 ml | |
7 | Cholesterol | Serum | 3.0 ml clotted | Plain red top | 120–220 mg/100 ml | |
8 | Triglycerides | Serum | 3.0 ml clotted | Plain red top | 40–150 mg/100 ml | |
9 | Lipid profile Total lipids HDL, LDL, VLDL | Serum (fasting) | 3.0 ml clotted | Red top | Normal HDL cholesterol-more than 45 mg/dl LDL cholesterol-upto 130 mg/dl VLDL cholestrol-7–33 mg/dl | |
10 | Triglycerides | Serum | 3.0 ml clotted | Red top | 35–150 mg/dl | |
11 | LDH (Lactic dehydrogenase) | Serum | 3.0 ml clotted | Red top | 50–150 U/L | |
12 | Blood gases arterial O2 saturation PO2, PCO2, pH | Arterial heparinized blood | 1 ml clotted | Syringe | PCO2 Above 500 mm Hg while on 100% O2 | O2 saturation 96–100% PO2 = 75–100mm Hg PCO2 = 35 –45 mm Hg pH = 7.35 – 7.45 |
13 | Electrolytes | Serum clotted | 3 ml clotted | Red TOP | ||
Na K Cl Mg Urea Uric acid | Sodium 135–145 mEq/L Potasium 3.5–5 mEq/L Magnesium 1.5–2mEq/L Chloride 98–110 mEq/L Urea 10–50 mg/dl Uric acid 2–6 mg/dl | |||||
14 | P.T. (prothrombin time) | Citrated | Blue top | Mix well avoid hemolysis send to lab in 30 minutes | Less than 2 seconds deviation from control | |
15 | PTT (partial thromboplastin time) | Citrated | Blue top | 25–37 seconds | ||
16 | Bleeding time | Finger prick | Capillary tube and blotting paper | 3–7 minutes | ||
17 | WBC | EDTA | 3.0 ml clotted | Purple top | Total (4000–11000/100 ml) Differential Neutrophils 60–70% | |
Lymphocytes-25–35% Monocytes-5–10% Eosinophils-1–4% Basophils-upto 1% | ||||||
18. | RBC | EDTA | 3.0 ml clotted | Purple top | Male-4.5–6.5 × 10⁶/µl Female-3.8–4.8 × 10⁶/µl | |
19. | Hemoglobin | EDTA | 3.0 ml clotted | Purple top | Male-13–18 gm% Female-12–16 gm % | |
20 | Platelets | EDTA | 3.0 ml clotted | Purple top | 150–400 × 103/µl | |
21 | Hematocrit | EDTA | 2.0 ml | Blue top | Male 45–52% Female 37–48% | |
22 | ESR (Erythocyte sedimentation rate) | EDTA with anticoagulant | 2.0 ml | Blue top | Male less than 15 mm/hr Female less than 20 mm/hr | |
23 | Calcium | Serum clotted | 4–6 ml | Red top | No tourniquet | 8–10 mg/dl |
24 | CPK (Cretinine phosphokinase) | Serum | 3.0 ml | Red top | Male 15–105 U/L Female 10–80 U/L | |
25 | Thyroid hormone | Serum | 5.0 ml | Red top | TSH—0.3–5.4 µU/ml T3—110–230 ng/dl T4—5–12 µg/dl | |
26 | PCV (Packed cell volume) | EDTA (with anti-coagulant) | 2 ml | Blue top | Male—40–54% Female—37–47% | |
1.18: COLLECTING BLOOD FOR ROUTINE EXAMINATION
DEFINITION
Obtaining blood sample by veni puncture for routine lab investigations.
PURPOSES
- To determine variations if any in blood composition.
- To determine any abnormality in order to aid in diagnosis.
ARTICLES
- Tourniquet.
- Small mackintosh.
- Syringes 5 ml, 10 ml.
- No.20 gauge needles or vacutainer assembly.
- Alcohol swabs.
- Disposable gloves.
- Specimen container – test tube or bottle.
- Laboratory requisition form.
- Sterile gauze pads (2”× 2”)
- Adhesive tapes.
PROCEDURE
Nursing action | Rationale | |
|---|---|---|
1. | Check the physician's order | |
2. | Identify the patient | Ensures performance of procedure on right patient. |
3. | Reassure the patient and explain that relatively little blood will be taken | Obtains patient's co-operation and confidence. |
4. | Wash hands and put on gloves | Protects health care worker from possible exposure to blood. |
5. | Select and examine the vein, visualize the vein, including the antecubital area, wrist, dorsum (back) of the hand and top of foot (if necessary). Palpate the vein | Select a vein that is visible, palpable and fixed to the surrounding tissues so that it does not roll away |
6. | Instruct the patient to extend his arm. Hold the arm straight at the elbow with fist clenched | Proper positioning reduces risk of injury |
7. | Apply the tourniquet 5 to 15 cm above the selected site with just sufficient pressure to obstruct venous flow | A tourniquet when applied increases venous pressure and makes the vein more prominent and easier to enter. |
9. | Cleanse the skin with alcohol swab in a circular motion - center to periphery. Allow to dry | Cleansing the skin reduces the number of microorganisms |
10. | Fix chosen vein with thumb and draw the skin taut immediately below the site before inserting needle to stabilize the vein. | The vein may roll beneath the skin when the needle approaches its outer surface, especially in elderly and extremely thin patients. |
11. | Hold the syringe between the thumb and last three fingers with the bevel up and directly in line with the course of the vein. Insert the needle quickly and smoothly under the skin and into the vein (Figure 1.18(a)) | |
12. | Obtain blood sample by gently pulling back on the plunger (Figure 1.18(b)) | Use minimal suction to prevent hemolysis of blood and collapse of vein. |
13. | Release the tourniquet as soon as the specimen is obtained and ask the patient to open the fist. | |
14. | Apply sterile 2’ × 2’ gauze piece to puncture site without applying pressure and withdraw needle slowly along the line of vein | Slow withdrawl of the needle is less painful and reduces trauma |
15. | Request patient to apply gentle but firm pressure to site for 2 – 4 minutes | Firm pressure over puncture site prevents leakage of blood into surrounding tissues with subsequent hematoma development |
16. | Remove the needle from the syringe as soon as possible after withdrawing blood, gently eject the blood sample into the appropriate container without forming bubbles in the test tube or bottle (Some tests require container with anticoagulant) | Gentle ejection of blood prevents hemolysis |
17. | Invert the tube gently several times to mix blood with anticoagulant where applicable. For some tests blood is allowed to coagulate in the test tube | Gentle handling of specimen prevents risk of hemolysis. |
18. | Label specimen correctly and send to laboratory immediately with completed requisition forms. | Specimen should reach the laboratory with the minimum of delay for optimum reliability. |
19. | Dispose the needle and syringe in appropriate containers. | Avoids possible spread of blood-borne diseases. |
20. | Clean all spills with 10% bleach (sodium hypochlorite) solution. Remove gloves and wash hands. | Avoids possible spread of blood–borne diseases. |
21. | Record in the patient's chart the procedure and the tests for which the sample was sent to the laboratory. | |
22. | Replace the tray with the reusable articles in proper place | |


1.19: MEASURING BLOOD GLUCOSE LEVEL USING GLUCOMETER
DEFINITION
Measuring the blood glucose level with the help of a portable glucometer.
ARTICLES REQUIRED
- Blood glucose meter
- Testing strips/reagent strips
- Sterile lancet
- Cotton balls
- Alcohol swab
- Disposable gloves.
PROCEDURE
Nursing action | Rationale | |
|---|---|---|
1 | Check physician's order | Confirms time for checking blood glucose. |
2 | Review manufacturer's instructions for glucometer use. | Helps in doing procedure accurately. |
3 | Gather articles at the bedside | Provides an organised approach during the procedure. |
4 | Explain the procedure to the patient. | Helps to gain patient's co-operation |
5 | Have the patient wash hands with soap and water. Use warm water if available. | Washing hands reduces transmission of microorganisms. |
6 | Position the patient comfortably in a semi-fowlers position or upright position | Increases blood flow to puncture site. |
7 | Wash hands. Don disposable gloves | Prevents spread of microorganisms. Gloves protects from exposure to blood and body fluids. |
8 | Remove test strip from the container and recap container immediately | Immediate recapping protects strips from exposure to light and discoloration. |
9 | Turn monitor on and check whether the code number on strip matches with the code number on the monitor screen. | Matching the code numbers on the strip and glucometer ensures that machine is calibrated correctly |
10 | Take the lancet without contaminating it. Select appropriate puncture site. | Aseptic technique maintains sterility. |
11 | Massage side of finger for adults (heel for children) toward puncture site and wipe with alcohol swab. | Massage increases blood flow to the area. |
12 | Hold lancet perpendicular to skin and prick site with lancet. (Figure 1.19(a)) | Holding lancet in proper position facilitates proper skin penetration. |
13 | Wipe away the 1st drop of blood from the site. | The first drop may impede accurate result because it may contain large amount of serous fluid. |
14 | Lightly squeeze or milk the puncture site until a hanging drop of blood has formed. | The blood droplet should be large enough to cover the test pad on the strip and it also facilitates accurate test results. |
15 | Gently touch the drop of blood to pad on the test strip without smearing it (Figure 1.19(b)). | Smearing of the blood will alter results. |
16 | Insert strip into glucometer according to directions for that specific device. Some devices require that the drop of blood is applied to a test strip that has already been inserted in the monitor. (Figure 1.19(c)) | Correctly inserted strip allows glucometer to read blood glucose level accurately. |
17 | Apply pressure to puncture site using a dry cotton ball. | This will stop bleeding at the site. |
18 | Read blood glucose results displayed on the monitor and inform the patient about results. (Figure 1.19(d)) | |
19 | Turn off the glucometer | |
20 | Dispose supplies appropriately and discard lancet in sharp's container. | Reduces contamination by blood. Sharps must always be handled properly to protect others from accidental injury. |
21 | Remove gloves and discard. Wash hands. | |
22 | Record blood glucose level in the chart | This facilitates documentation of procedure and provides for comprehensive care. |


SPECIAL CONSIDERATIONS
- In patients who require regular blood-glucose monitoring, shallow penetration should be encouraged to avoid tissue damage.
- Rotate or change sites to allow time for the penetrated site to heal.
- To reduce pain, choose side of fingertips or side of heel for children. where few nerve endings are present rather than central part of fingertips.
- Patients should compare their personal glucometer reading with the laboratory measured blood glucose level, every 6–12 months.
1. 20: COLLECTION OF BLOOD FOR CULTURE
DEFINITION
Collection of blood for culture to determine presence of microorganisms in the blood.
ARTICLES REQUIRED
- Blood culture bottles (3)
- Cotton swab
- Spirit
- Syringe(10–20 ml)
- Needle
- Povidone – Iodine solution
- Sterile gloves
- Tourniquet
- Laboratory requisition form.
PROCEDURE
Nursing action | Rationale | |
|---|---|---|
1 | Assess the physician's order for blood culture investigation. | Obtains knowledge of samples to be collected and the reason for doing culture. |
2 | Explain procedure to the patient and provide a comfortable position. | Gains co-operation of the patient during the procedure. |
3 | Wash hands. Don sterile gloves | Reduces transmission of microorganisms and maintains aseptic technique. |
4 | Apply tourniquet above the puncture site and palpate the venipuncture site. | Restricts blood flow and promotes easy visibility of veins. |
5 | Wipe the site with 70% alcohol in a circular manner from center to peripheri for approximately 5 cm in diameter and allow to dry. | |
6 | Cleanse the site again with povidone —iodine starting from center in even widening circles. Allow the iodine to remain on the skin for at least one minute. | Avoids contamination and maintains a sterile field. |
7 | Clean the cover of the culture bottles with povidone iodine followed by spirit. | Maintains sterility of equipment. |
8 | Puncture the site and draw 10 ml of blood (Adults 10–20 ml of blood preferred) | |
9 | Remove the tourniquet once the blood is collected. | Restores circulation. |
10 | Remove the needle and apply pressure to the puncture site with dry cotton simultaneously. | Stops bleeding from the puncture site. |
11 | Wipe the site with 70% alcohol. | |
12 | Change the needle with a fresh needle before injecting the blood into the bottles. | |
13 | Remove the metal cover on the cap of culture bottles and push 10 ml of blood into each of the bottles. While injecting blood into the bottles be careful not to touch the sides of the bottle (Figure 1.20(a)) | Maintains strict aseptic technique |
14 | Mix the blood and culture media by shaking the bottle gently. | |
15 | Discard the contaminated articles. Remove gloves | |
16 | Wash hands | Reduces transmission of infection. |
17 | Fill the lab requisition form appropriately and label the bottles with patient's name, identification number, date and time of collection | |
18 | Transfer the specimen to the lab immediately. | |
19 | Record the procedure in the patient's chart with date and time of collection. | Communicates pertinent information to members of health care team. |
20 | Repeat the procedure within an interval of 30 minutes to one hour as per the number of samples required from different puncture sites. | |

SPECIAL CONSIDERATIONS
- Blood for culture should be taken before antibiotics are administered.
- If there is regular periodicity of the fever, the advantageous time to draw blood will be just before the anticipated rise in temperature.
- For children, 2–5 ml and neonates 1–2 ml of blood is required for culture investigation.
- Blood should never be taken from an IV line or from above an exisiting IV line.
- For patients with clinical diagnosis of endocarditis, two or three sets of blood cultures (a set consists of one aerobic and one anaerobic culture from one site) should be performed over a 24-hour period to assess for sustained bacteremia.
1.21: COLLECTING BLOOD FOR PERIPHERAL SMEAR
DEFINITION
Obtaining a small sample of blood by skin puncture for peripheral smear.
PURPOSES
- To detect malarial parasites.
- To detect blood cell abnormalities.
ARTICLES
- Disposable lancet.
- Pipette and tubing.
- Slides.
- Cotton swabs /Alcohol prep pads.
- Alcohol.
- Disposable gloves.
- Laboratory forms.
PROCEDURE
Nursing action | Rationale | |
|---|---|---|
1. | Check the physician's order and nursing care plan. | Obtains specific instructions and information. |
2. | Identify the patient. | Ensures that right procedure is performed for right patient. |
3. | Give explanation to patient about the procedure. | Obtains patient's co-operation and consent. |
4. | Wash hands and put on gloves. | Protects health care workers from possible exposure to blood. |
5. | Cleanse site (ball of finger) with alcohol and dry with sterile cotton swab. | If any alcohol remains, it will alter red cell morphology. Blood will not collect into a compact drop, but will run down the finger if it is not dry. |
6. | Prick the skin sharply and quickly with sterile, disposable lancet. | Pricking the skin sharply and quickly minimizes pain during procedure and helps to obtain a flowing sample. |
7. | Release pressure on the finger, wipe off the first drop of blood. | Epithelial and endothelial cells may be found in the first drop of blood and may render the count inadequate. |
8. | Allow the blood to flow freely with an adequate puncture. | Pressing out the blood dilutes it with tissue fluid. |
9. | Obtain the blood sample, fill the pipette and make blood smears on the slides (Figure 1.21(a)) | |
| ||
10. | Apply pressure over the puncture site, with a dry cotton ball until bleeding stops. | |
11 | When the film is dry, label the slide wrap it and dispatch to laboratory. | |
12. | Remove gloves, wash hands and dispose off articles in approved containers. | |

1.22: COLLECTION OF SPUTUM FOR CULTURE
DEFINITION
Collection of coughed out sputum for culture to identify respiratory pathogens.
EQUIPMENTS
- Sterile specimen container
- Sputum cup
- Tissue paper
- Gloves
- K-basin
- Suction catheter (optional)
- Suction apparatus (optional).
PROCEDURE
Nursing action | Rationale | |
|---|---|---|
1 | Check the physician's order | |
2 | Explain to client that the specimen must be taken from sputum, coughed up from back of the throat or lungs | Promotes patient's co-operation |
3 | Ask the patient to sit erect in bed if possible. | Provides easy access for collection of specimen. |
4 | Wash hands and put on gloves | Reduces transmission of microorganisms. |
5 | Keep a sterile specimen container ready for the sample and take a tissue paper in hand. | |
6 | Remove lid of container and place with inner side facing upwards | Prevents contamination. |
7 | Instruct the patient to take deep breaths and then cough out deeply. | It helps to loosen the secretions and obtain adequate specimen. |
8 | Explain to the patient that he has to expectorate the sputum into sterile labelled container without touching the inside of it. | Prevents contamination of the specimen. |
9 | Close the container without touching inside of lid. | |
10 | Provide client with tissue paper and a comfortable position. | Promotes patient comfort. |
11 | Replace articles | |
12 | Wash hands | Reduces transmission of microorganisms. |
13 | Provide mouth care if patient needs it or encourage patient to carry out oral hygiene. | Removes unpleasant taste in mouth. |
14 | Document obtained specimen, date and time of collection and characteristics of the specimen and send specimen to lab. | Helps in continuity of care. |
SPECIAL CONSIDERATION
1. 23: ASSISTING WITH OBTAINING A PAPANICOLAOU SMEAR
DEFINITION
It is a cytologic examination of desquamated epithelial tissue to differentiate normal from anaplastic cells and it is also a widely used cancer screening test.
PURPOSES
- To detect cervical and vaginal carcinomas.
- To perform routine screening and for diagnosing disorders of reproductive system.
METHODS OF OBTAINING PAP (PAPANICOLAOU) SMEAR
- Slide method
- Liquid method (Thin Preparation)
ARTICLES NEEDED
- A glass slide
- A sterile Ayre's spatula
- Cusco's speculum
- A pipette
- A sterile cotton swab
- Sterile gloves
- Ether/95% alcohol solution (1: 1)
- Spray fixative
- A graphite pencil
- Light source
- K-Y jelly.
PROCEDURE
Nursing action | Rationale | |
|---|---|---|
1 | Check the physician's order and progress notes. | Obtains specific instructions/ information. |
2 | Identify the patient and check identification against physician's order. | Ensures that the right procedure is performed on the right patient. |
3 | Explain the pap cytology test to the patient. Allow questions to be asked. Consider the protocols to be followed in specific cases. | Obtains patient's consent and co-operation. Promotes patient education. In rape cases, vaginal swabs may be used for forensic evidence. |
4 | For patients of child bearing age, test should be done 10–20 days after the first day of LMP, and definitely not when the patient is menstruating or bleeding, unless bleeding is a continuous condition. | A smear taken any time other than in the mid menstrual cycle can result in abnormal findings. Heavy menstrual flow and blood may make the interpretation of the results difficult and may obscure atypical cells. |
5 | Instruct the patient not to douche for 2 to 3 days before the test. | Douching may remove the exfoliated cells. |
6 | Instruct the patient not to use vaginal medications or vaginal contraceptives during the 48 hrs before the examination. Intercourse to be avoided the night before the examination. | Use of contraceptives before examination may result in false test results. |
7 | Instruct the patient to empty her bladder and rectum before examination. | Ensures comfort during the procedure. |
8 | Ask the patient to give the following information:
| Identifies if patient is an adolescent, pregnant or postmenopausal woman. Hormones and contraceptive devices can alter the findings. Some medications alter the test results. |
9 | Obtain the requirements of the procedure | |
10 | Using the graphite pencil, label the ends of the slide with the patient's name and the collection site. | |
11 | Ask the patient to undress from waist down. | |
12 | Position the patient in a lithotomy position on an examination table and drape | Ensures good visibility and promotes comfort and provides privacy. |
13 | Don sterile gloves, lubricate and insert a sterile Cusco's speculum. | |
14 |
| |
| ||
15 | Give the patient a perineal pad after the procedure to absorb any bleeding or drainage. | |
16 | Write the patient's age: the reason for the study, the LMP, etc. on the requisition form and send the slides to the cytology laboratory. | |


SPECIAL CONSIDERATIONS
- Smears that dry before fixative is applied cannot be properly interpreted.
- Do not lubricate the speculum as it may distort cells.
- A smear taken any time other than in the mid menstrual cycle can result in abnormal findings.
- Tetracycline or digitalis preparations can affect the appearance of squamous epithelium.
- Blood, mucus or pus on the slide makes interpretation difficult.
1.24: MEASURING INTAKE AND OUTPUT
DEFINITION
It is defined as the measuring and recording of fluid intake and output (I and O) during a 24-hour period which provides important data about a patient's fluid and electrolyte balance.
PURPOSES
- To assess patient's general health.
- To monitor specific disease conditions
- To assess the fluid and electrolyte balance.
ARTICLES
- Intake and output form at bedside
- Intake and output graphic record in chart
- Bedpan or urinal or bedside commode
- Graduated drinking cup/tumbler
- Graduated container for output
- Clean gloves
- Sign at bedside that patient is on intake and output measurement.
PROCEDURE
Nursing action | Rationale | |
|---|---|---|
1. | Identify the patient | |
2. | Explain the methods of maintaining. Intake and output. All fluids taken orally must be recorded on the patient's intake and output form (Input and output flow sheet) | Helps to obtain patient's co-operation and encourages patient's participation. |
3. | Wash hands every time prior to giving oral fluids | Reduces transmission of microorganisms |
4. | Measure all oral fluids in accordance with institutional policy Example: a. Water glassful = 200 ml b. Cupful = 120 ml Paper cup a. Large = 200 ml b. Small = 120 ml Soup bowl full = 180 ml Water pitcher full = 1000 ml Measure all fluids in the graduated cup/tumbler before giving to patient. | Provides for consistency of measurement |
5. | Record time and amount of fluid intake in the designated space on bedside chart. Include all semi solid and liquid food rich in fluids (oral, IV, tube feedings and IV fluids) | Documents the amount of fluids accurately |
6. | Transfer eight hours total fluid intake from bedside intake and output chart to 24 hour intake and output record in patient's chart. | Provides for data analysis of the patient's fluid status every 8 hour shift. |
7. | Record all fluid intake in the appropriate column of the 24-hour record | Documents intake by type and amount |
8. | Complete 24-hour intake record by adding all eight hour totals. | Provides consistent data for analysis of the patient's fluid status over a 24 hours. |
9. | For measuring output include urinary output and other drainage from patient. (Figure 1.24(a)). | Documents the amount of output accurately. |
10. | Urinary output • After each voiding measure the urine using a measuring container and record it with the time of voiding on the intake and output form (Figure 1.24(b)). | |
• For patients with retention catheter empty the drainage bag into a measuring container at the end of the shift or at prescribed times if output is measured more often. • For infants and incontinent patients the output may be measured by first weighing diapers or incontinent pads that are dry and then subtracting this weight from the weight of soiled items Note and record it. | ||
11. | The amount and type of fluid (urine, drainage from NG tube, drainage tube) are recorded in the intake and output form | Documents output. |
12. | Transfer 8 hour output total to 24 hours intake and output record on the patient's chart. | Provides for data analysis of the patient's fluid status. |
13. | Complete 24 hours output record by totaling all 8 hours total. | Provides consistent data for analysis of the patient's fluid status over a 24 hours period |


SPECIAL CONSIDERATIONS
- Proper aseptic technique should be taken while handling patient's body fluid output viz blood, urine etc.
- Remember that fluids taken to swallow pills must be recorded as intake
- Do not have visitors or family members empty bedpan, urinal or catheter bags.
1.25: TEACHING BREAST SELF-EXAMINATION (BSE)
DEFINITION
Breast self–examination is a technique which women use to assess their own breasts to detect breast carcinomas at the earliest.
ARTICLES
- Mirror
- Gloves
- Small pillow/rolled towel.
PROCEDURE
Nursing action | Rationale | |
|---|---|---|
1. | Identify the patient and review personal history and family health history. | Identifies risk factors and previous baseline data |
2. | Explain procedure to the patient. Ask her to disrobe to the waist and to put on a gown with the opening in the front | Provides easy access while maintaining maximum privacy |
3. | Wash hands. Don gloves if required by agency policy | Prevents transfer of microorganisms and possible contact with discharge when palpating nipples |
4. | Provide privacy and assist the patient to sitting position facing you and expose chest and breasts. | Allows comparison of breasts bilaterally |
5. | Explain and teach breast self–examination as you examine. For inspection, ask the patient to stand before the mirror and check both breasts for anything unusual with patients:
| • Flesh color, slight inequities in size and symmetry, rounded shape and smooth skin surface is normal. • Redness, blue hue, retraction, dimpling, enlarged pores, edema, lumps, lesions, rashes, ulcers and discharge are abnormal. • Supernumerary nipples along the milk line are a normal variant. |
6. | Explain and teach the palpation method. Teach the patient to use the right hand to palpate the left breast and vice versa. During the examination, place the patient's fingers under your fingers | Teaching during examination reinforces the need for and understanding of breast examinations, and enables the patient to identify normal breast tissue and abnormal tissue if present thus increasing confidence in performing BSE |
7. | Using the pads of the palmar surfaces of the fingertips, palpate the right breast by gently compressing the mammary tissues against the chest wall. Palpation may be performed from the periphery to the nipple, in either concentric circles, wedge sections or vertical strip (Figure 1.25(b)). | Warm temperature, elasticity, tenderness, pain, erythema, masses or nodules are abnormal. |
8. | Palpate areola and nipple using a similar circular technique as with breast. Pay special attention to subareolar part and gently press the nipple between the fingers | Inflammation, discharge, nodules fissuring and lesions are abnormal. |
9. | Palpate into axilla starting at anterior axillary line and continuing at an angle to the mid axillary line and up into the axilla (using same circular fingertip motion). Have patient place arm at side and palpate deep into the axilla. Identify posterior axillary, central axillary, anterior axillary and lateral axillary node locations. | Nodes should be less than 1 cm and non tender |
10. | Repeat steps 7–9 on the left breast, areola, nipple and axilla. Identify normal versus abnormal as with the right breast. Compare breasts bilaterally | |
11. | Assist the patient to supine position. Place arm on examination side under the head, and place a small pillow under the same side scapula | This position spreads breast tissue over the chest wall maximizing palpation accuracy |
12. | Assist the patient to palpate the breast, areola and nipple as in steps 7–9 with the other hand and vice versa | Re-evaluate examination findings in second position |
13. | Assist the patient to a sitting position. Review the steps and ask the patient to demonstrate breast self-examination | Provide more comfort for patient. Evaluate success of the teaching |
14. | Allow patient to dress | Provide for patient's comfort |
15. | Remove gloves and wash hands | Reduce transmission of micro-organisms |
16. | Give the patient written materials to reinforce teaching | Reinforce teaching. Provides a readily available form to patient for reference when at home |
17. | Record date, time, findings of abnormalities and absence of abnormalities, patient's response to findings and teachings | |


SPECIAL CONSIDERATIONS
- Instruct patients not to use creams, lotions or powders and not to shave underarms 48 hours before the scheduled assessment, because these things could alter the breast skin or cause folliculitis and lymph node enlargement.
- Explain that BSE is best performed after menses (5th –7th day) for pre-menopausal women and first day of the month for postmenopausal women.
- Educate even men to perform a monthly BSE and obtain a clinical examination every 1 to 3 years because 1% of all breast cancer is found in men.
- Advise the patient to palpate her breasts during shower, as the fingers will glide easily over soapy skin, so that one can concentrate on feeling for changes in the breasts.
- During BSE pay special attention to upper outer quadrant area and the tail of Spence, where about 50% of breast cancers develop.
- Instruct patient that a baseline mammogram is to be obtained at 35 years and followed by annual mammogram after 40 years.
- Determine if patient is taking oral contraceptives, digitalis, diuretics, steroids or estrogen hormones. These medications may cause nipple discharge and hormones may cause fibrocystic changes in breast.
- Instruct mother to report if any lumps, tenderness or nipple discharge exists.
1.26: TEACHING TESTICULAR SELF–EXAMINATION (TSE)
DEFINITION
Testicular self-examination is a technique used to examine the testes by self for detecting abnormalities like testicular cancer.
PROCEDURE
Nursing action | Rationale | |
|---|---|---|
1. | Identify the patient and review personal history, medication, and family health history | Identifies risk factors and previous baseline data |
2. | Explain the procedure to patient, provide privacy and ask the patient to disrobe completely and to put on a gown | Obtains patient's co-operation and provides easy access while maintaining maximum privacy |
3. | Wash hands, and apply clean gloves | Practices clean technique |
4. | Instruct the patient to stand and fold up his gown to expose the genitalia | Provides best exposure for examination |
5. | Advise the patient to use both hands to palpate the testes. The normal testicle is smooth and uniform in consistency. Note the size, lie, shape, consistency and tenderness The length of a normal testes should be greater than 4 cm and the volume greater than 20 ml | The left testicle normally sits slightly lower than right testicle. The testicles are rubbery and approximately equal in size Pressure on testes normally produces a deep visceral pain. Twisting or torsion of the testes causes venous obstruction, edema and eventually arterial obstruction. |
6. | Advise the patient to palpate each testis one at a time and feel for any evidence of a small, pea size lump or abnormality (Figure 1.26(a)) | |
7. | Teach the patient to locate and palpate the spermatic cord and vas deferens between the thumb and fingers (from epididymis to the inguinal ring) (Figure 1.26(b)) | Note any nodules or swelling |
8. | Explain that it is normal to find that one testis is larger than the other | |
9. | Assist the patient to a comfortable position. Review the steps and ask the patient to redemonstrate testicular self-examination | Provides more comfort for patient. Evaluate success of the teaching given. |
10. | Remove gloves and wash hands | Reduces risk of transmission of microorganism |
11. | Give the patient written materials if available. | Reinforces teaching. Provides a readily available form to patient for reference when at home |
12. | Record date, time, findings of palpation and patient's response to findings and teaching. | |


SPECIAL CONSIDERATIONS
- Advise patient to perform testicular self–examination on one particular day of each month.
- It is advisable to perform testicular self–examination after a warm relaxing shower.